BMW Car Club - Scotland
DIY - E36 Rear Window Seals
Tools required :
- Socket set including T20 and T40 Torx / 'star' bits along with 10mm and 16mm sockets for removing standard nuts.
- A suitable handle for the 16mm and T40 sockets for decent leverage
- A flexible / adjustable handle for the T20 bit to get at the fiddly retaining screws at the window catch.
- Flat head screwdriver & Masking Tape - you may want to use this while working with the trim to ensure eveything ends up in the right place.
- Remove the clip which covers the seat belt nut and then remove the seat belt nut as shown below (middle green mark)

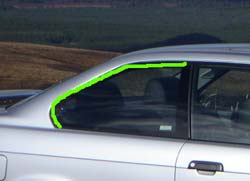
- Remove the trim as shown above. There is a clip at the top in the center (top green mark). Pull firmly outwards and this will pop out. The lever for adjusting the seatbelt height will also pop out. Finally there are two 'lips' at the foot of the trim (bottom green mark) which you will now be able to manoeuver out.
- Remove the T40 torx bolts which hold the height adjusting unit in place and remove the unit. This will expose the bolts which hold the window in place.

- Remove the T10 screw from the catch used to open the window. Be careful not to drop it.

- Remove the window nuts. It's probably best to enlist some help at this point to ensure you don't drop the window! Also take care not to drop the nuts.

- Out with the old trim and in with the new. You could take the chance to have a good clean at the same time.

- Reverse the process to get your car all back together again, making sure not to drop any of the nuts/screws while you're working. The trim will need some patience to refit to ensure that it does not impede the auto-retract mechanism for the seatbelt.
PS If you want to do the lower trim, see e36coupe.com.
Sponsored by :
